 2016 – Part 1")
Before we start installing it let’s discuss why should we implement it and what would we need to think about before we deploy it in our environment.
First question would be, how are you tracking your IP addresses? Many admins are using Excel spreadsheets. That’s not a very scalable solution. We can do a Google search and download Excel-based templates that try or attempt to make IP address management more workable, but the bottom line is as a busy Windows system administrators we’re likely not going to be 100% accurate in updating these spreadsheets. It’s just not a good solution.
Other questions would be: what insight do you have into your IP address allocations, who owns which range? How are your scopes setup, how to you know which statically assigned IP are actually in use, how to you know when dynamic IP are used and which host used an IP in the past, if a remote office admin created a new scope, how would you know about it, how to you keep track of file based DNS Zones, etc?
These are all good questions that can be answered by a good implementation of a solution such as IPAM.
We can look at IPAM as a data-driven application that’s useful for managing, monitoring, and reporting on all our IP address data. It gives us centralized DHCP and DNS Management. It discovers DC, DHCP, DNS and NPS roles. A neat thing from a design standpoint is that IPAM uses WS management, which is WinRM WMI, the traditional Windows remote access protocol and does not require the installation of an agent, so as a systems architect this is a good thing that we don’t have to worry about installing software on every managed server. We’re actually going to see, in addition to the role-based access control security model that IPAM relies on Windows Task Schedule jobs for most of its activities. I’m thinking of jobs like server discovery and server querying, interrogation for server data.
What IPAM can do?
- Determine which DNS/DHCP servers are present in an environment
- Quickly determine an organizations’s IP space utilization
- Configure DHCP and DNS Properties
- Create, Configure and Manage DHCP and DNS scopes/zones and options
- Manage IP addressing
- Record historical data, etc
What’s new in 2016?
- Multi forest support – (You can use IPAM to manage the DNS and DHCP servers of multiple Active Directory forests when there is a two-way trust relationship between the forest where IPAM is installed and each of the remote forests.
- Purge Utilization data – You can now reduce the IPAM database size by purging the IP address utilization data that is older than a date that you specify.
- Powershell support for RBAC – You can use Windows PowerShell to set access scopes on IPAM objects.
- Enhanced DNS service management – IPAM supports DNS resource record, conditional forwarder, and DNS zone management for both domain-joined Active Directory-integrated and file-backed DNS servers.
STATS
In terms of IPAM stats (According to Microsoft documentation), a single IPAM server can support up to 150 DHCP servers, which translates in Microsoft terminology to 6000 scopes, IPAM, a single server again, can support up to 500 DNS servers or 150 zones. Forensically, IPAM can store up to three years worth of forensics data. This deals with IP address tracking, who picked up which lease when, and speaking of who, the supported upper limit is 100,000 users, so IPAM has some pretty nice stats out of the box.
Limitations
- IPAM server must be installed on a domain member computer
- You cannot install IPAM on a domain controller.
- Avoid installing it on DHCP/DNS servers. Exemple, if IPAM is installed on the same server with DHCP, then DHCP server discovery will be disabled.
- Domain membership for dhcp and dns is required, you cannot manage DHCP/DNS servers which are not part of the domain
- You will not be able to manage 3rd party products. IPAM is a Microsoft-centric solution, so if you’re in a heterogeneous environment and you have Linux or OS 10 infrastructure servers, then you’re out of luck. IPAM assumes that you’re running Windows DHCP, Windows DNS
- You cannot integrated it with Azure
- Still requires DNS/DHCP consoles
- No IPAM scale out – you have one server and 1 database. You can’t add additional IPAM servers. If you want to make it HA you will need to put database on SQL server and made SQL HA. IPAM don’t share database.
IPAM Deployment Topologies
- CENTRALIZED –> 1 IPAM server for the whole organization. This deployment type is pretty much the way that most organization will go. Even if you have DHCP and DNS servers all around the country, you can have 1 IPAM server which can go out and hook in to all of your DHCP and DNS servers
- DISTRIBUTED –> IPAM servers for each branch office or region. This deployment is appropriate if you have IT team in each region. Each region looks after its own IP addresses and you can put IPAM server in each region and DHCP/DNS are going to talking to that one.
- HYBRID –> Central IPAM server in conjunction with branch office IPAM servers. IPAM is agentless, it does not control DHCP/DNS servers. You can have multiple IPAM servers talk to different DHCP/DNS servers. You can have central IPAM server and IPAM servers in each region and you can configure them so that central see everything and regional IPAM servers only regional things.
Now when we know the deployment topologies and what we need to do before we can implement IPAM, let’s see how we can install the IPAM services and move forward with the deployment.
Open Server Manager –> Manage –> Add Roles and Features
Walk through the wizard accepting the defaults until you came to Select Features Page
Select IP Address Management (IPAM) Server and click on add additional features

Now in the Windows 10 world, so in the desktop world, the IPAM client’s going to be part of the remote server administration tools, so you’ll need to install that onto your desktops in order to access the little client piece that we’ll see after we complete the installation. IPAM also will install a copy of the Windows internal database by default; however, it will not require you necessarily to use that if you prefer to use, for example, a SQL Server as your actual database. The database that IPAM is using is really, really small, and so the reason you would want to use a database other than the Windows internal database is perhaps if you have SQL Server backups, or if you require some high availability that would not normally be a part of the Windows internal database.
Click Next and Install

Once Done, click Close

In the Server Manager click on IPAM node to take a look at the IPAM console, baked into Server Manager.

This tasks thing is actually very useful because it gives us not just the steps, the quick start steps in order, but their live links, so the first step is going to be Connect to IPAM server. Click on the link and connect to the server

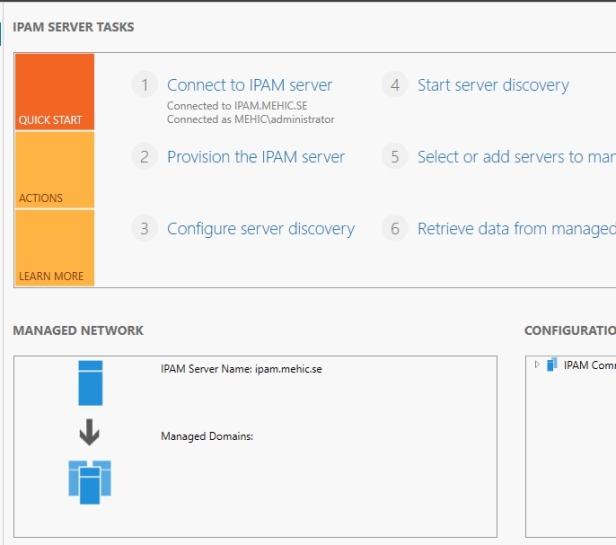
IPAM is a bit like remote desktop services after the installation, there’s some post installation work you have to do. Over here on number 2 is to actually provision the IPAM server. This provisioning is in many ways kind of a one time shot. Make sure you understand what you’re about to do because in order to undo certain things that we’re talking about next, you have to uninstall everything, and flush all the data that you have. So, just be aware that we’ve got some decisions that we have to make during this provisioning method so that we don’t involve ourselves with a reinstall.

On Before you begin page, click next
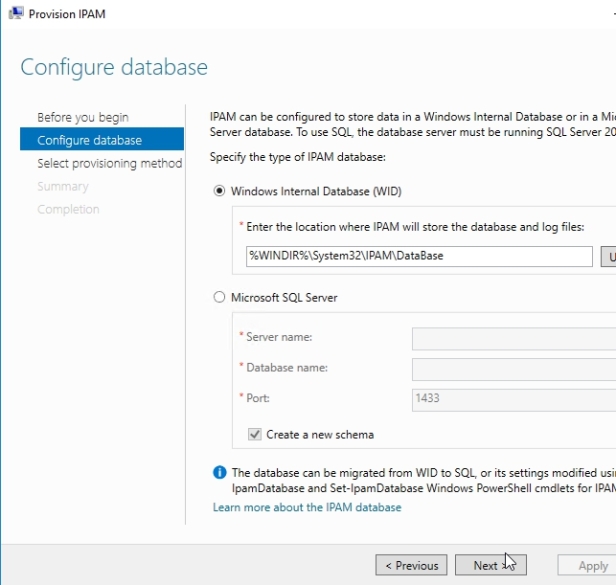
On Configure Database page, here we can determine which database we want to use for our IPAM database. It is perfectly okay to start out with a Windows internal database, I will show you later what you need to do, command that you should know if it comes time to upscale yourself from a Windows internal database to a regular version of SQL Server. I am going to install it to just our basic Windows internal database. Again, the database is really, really small, and the performance requirements for this database are relatively light as well, so you probably aren’t going to need SQL Server except in cases where you need to have it for other reasons, like high availability and backups. Click Next
On Select Provisioning Method page, I can determine how my clients/machines in my datacenter actually get interconnected with the IPAM services. Now it is here you have to make that very important decision, and if at all possible, if you have the ability to deploy this using group policy, please do so, because the steps you have to go through to actually make the connections manually are really, really complex. I would never recommend manual provisioning.
The good thing about it is that in order to use group policy, you start first with just creating a GPO name prefix. This GPO name prefix should reference the IPAM server that you intend on working with. So, if you have multiple IPAM servers you’ll need to have multiple different GPO name prefixes, because all these will relate to the instance that’s going to exist on server. I’ll call mine IPAM, just because it’s easy, and I have a single server here.

This will tell IPAM to prepare for three different GPOs that will end up in Active Directory, that it can populate with all the information that’s needed for configuring clients. You also will have to, as you can see, go through the creation of those GPOs by invoking command , Invoke-IpamGpoProvisioning
So, this screen just confirms the settings. We’re going to create these GPOs. We need to run that commandlet. We need to make sure that the database has been created and configured for access, which is what we’ve done. Any scheduled tasks that we’ll have to do. We’ll talk about that later. Same thing with security groups, and then we’ll turn on IP address tracking when we actually get into the IPAM console itself. Click Apply

Once Done, click Close

Now, for us to actually get it to work with the different services in our environment, the next step is to actually go through running that PowerShell command. Open Powershell as admin and type in Invoke-IpamGpoProvisioning -domain mehic.se -gpoprefixname IPAM -Ipamserverfqdn ipam.mehic.se
Looks like we’re creating those GPOs, we’re importing in the information, linking them to our domain, and everything now is successful.

Let’s go ahead and launch the GPMC console to verify what has actually happened in group policy. Now you’ll notice that three new group policies have been linked at the level of the domain, one for our DCs and network policy servers, one for DHCP, and one for DNS servers. When we begin adding servers to bring them under management by IPAM, those servers will get added to the security filtering list for GPO, so that only they will read and apply the group policy.

Our next task is to actually discover the servers that we want to bring under management in our IPAM server, and to do that click on Configure server discovery link

and here we can determine which domains we want to discover. Click on Get Forests to query AD and find forests that IPAM server is in and close and open the configuration server discovery window. In my case, I only have one, the root domain mehic.se

Click on ADD to select the server roles that we want to discover as well. So for mehic.se, which domain controllers do we have, which DHCP servers do we have, and which DNS servers do we have.
If I had multiple domains in the forest, I could specify all of the domains.
Once done, click OK

Our next step is to run Server Discovery, so click on that link

If we take a look at the More button, you can see that we’re going through that IPAM server discovery task. Once discovery completes, we’ll see which servers that we’ve actually discovered from this process


Like I said before, IPAM relies on Windows Task Schedule jobs for most of its activities so let’s take a look on that before we continue. Open Task Scheduler by clicking on Tools –> Task Scheduler

Expand Task Scheduler Library –> Microsoft –> Windows –> IPAM.
Here we have a series of jobs, and you can look at those at your leisure. Look at their default runtimes and so on, but basically server discovery is the one that we’re doing now, but there are day to day ones that you can kick off manually or just leave on a schedule.

The server discovery task is complete, so now we can come to step five, Select or add servers.

That will open Server Inventory and it looks like it detected both DC servers.

For any of the servers that we want to bring under management, the process that we do that involves right clicking the server, choosing to Edit that server

identifying which server type that machine actually is, so the discovery process actually figures out which of these services are installed on each machine, but if you are aware of different services that happen to be on that machine, you can change them here.

You can change the server name if you want, and then the most important bit is changing the manageability status to Managed.
If I have an owner and description information for these servers, I can apply it here as well.
Once Done click OK and do the same for other servers you have.

That’s it. You can see that the Manageability is set to Managed.

Before we continue, I would like to open Group Policy. I want to check the security settings of these GPO’s to verify that our servers got security settings. You can see under security filtering that our accounts are there.
The process by which a server switches from Unmanaged to Managed considering the configuration we’ve setup so far, actually has to do with getting that server entered into the Security Filtering box that’s associated with these three different GPOs we’ve created.
The other of these two, Blocked versus Unblocked, has a lot to do with whether or not the machine has actually received the group policy, or not. The machine actually doesn’t receive the group policy until it is set to Managed, because that’s how it gets in the Security Filtering box, and then also further on down, needs to actually receive, and then apply the group policy for it to then be Unblocked.
Why I want to show you this is that sometimes you will find (it was the case in Windows Server 2012 / R2) when you troubleshooting IPAM deployment that you need to manually add security accounts of the servers that you want to manage.

What we need to do now is to run gpupdate on those servers. Open Powershell and type in Enter-PSSession <computer name> and run gpupdate /force , Do that on all servers.

If you don’t see green check mark you can right click on the server and select Refresh Server Access Status and refresh the page. This can take some time so do not panic if you don’t see them Unblocked immediately.

They are green and now IPAM is responsible for managing these servers.

Once done, right-click on the those servers and select Retrieve All Server Data, to collect the information off of those machines. This process doesn’t take very long.

Once we have that information, then we have a servers that we can then view under our MONITOR AND MANAGE dialog box. Now remember that an IPAM server considers each individual service, DHCP, DNS, NPS, domain controllers separately because there are different configurations on those machines that have to occur so that IPAM can actually talk to those machines, and interact, and grab all the contents that it needs to from those machines.

Here under DNS and DHCP Servers, we can see the 4 machines we’re taking a look at. In fact, it’s just 2 machines that has both services on it, and if I scroll down, we can take a look at the variety of different elements for that machine that IPAM can currently now connect with. This gives us a nice look at the different configurations that exist for in this case DHCP.
So, we’re taking a look at MAC Address Filters, Dynamic Update is Enabled, Name Protection is Disabled, for example. Here are some further options we could look at if those options exist, the server options associated with that DHCP server. Any policies that have been configured. Also the event catalog items that exist on that DHCP server.

If you click on one DNS server you will see some slightly different information.

That’s it. In the next part we will move forward with our deployment and talk about IPAM permissions which is very important part to understand, IPAM blocks and ranges, IP addresses etc.
What we covered!
- What is IPAM and why we need it
- IPAM Deployment Topologies
- IPAM Limitations
- How to install and configure it
Thanks for reading!
Cheers,
Nedim

Hi Nedim,
I was searching through your site and I can say Excellent Work. Your site is a gold mine. I have never seen someone writing and explaining on this way, so good and wide. I am preparing for MCSA and your site is everything I need. Thank you so much for sharing the knowledge.
Greetings from Germany!
Hans
LikeLike
Hi Hans,
Thank you for the kind words.
Cheers,
Nedim
LikeLike
You are awesome man!!! This was an excellent article! I’m glad I found it. It was very easy to follow and your explanations are crystal clear.
I am very happy that I found your site. Keep up with good work
Regards,
Jonathan
LikeLiked by 1 person
Perfect, thank you
LikeLike
Thanks Nedim, Nice work!
LikeLike
Thank you Aamir
LikeLike
Very good article. Thank You
LikeLiked by 1 person
Invoke-IpamGpoProvisioning -domain mehic.se -gpoprefixname IPAM -Ipamserverfqdn ipam.mehic.se
I keep on getting an error with this statement. The domain for me is go.com, my gpoprefixname is IPAM, myfqdn is different it is server.go.com. When I input this command I keep on getting errors. For some reason it doesn’t like my domain. Then I’m not sure if it likes my servername as well.
Any suggestions on how I can correct?
LikeLike
Hi,
What error message do you receive?
LikeLike
Looks like you are in a multi-domain forest. Depending on where you are running it, try specifying a domain controller FQDN of the domain in which you are trying to run.
LikeLike
Very good Explanation , Thank u Very much for such a good article .
GL 🙂
LikeLike