
With that initial configuration now complete on our WSUS server, let’s explore the WSUS Console just a bit before we even get into any of the more hard-core configurations.
WSUS CONSOLE
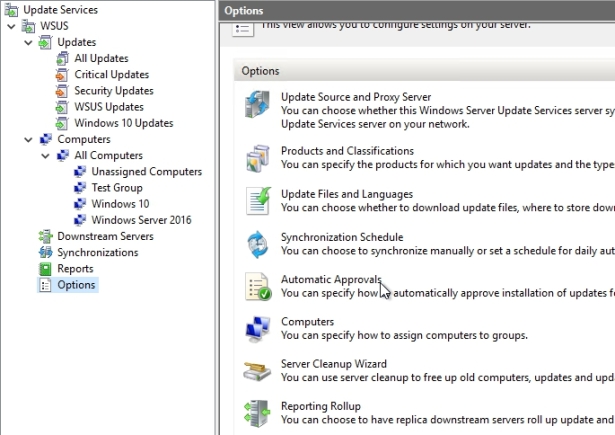
This is the WSUS console and this console will be factored towards whatever machine you happen to be plugging it into, which in my case is this machine WSUS.
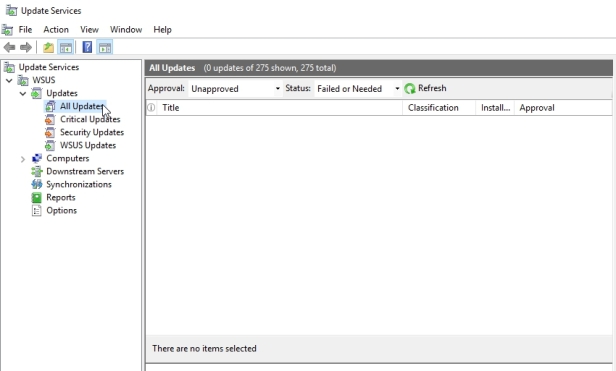
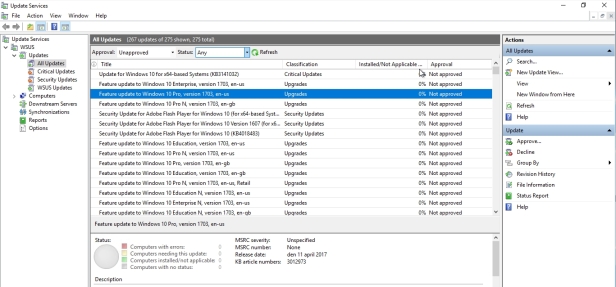
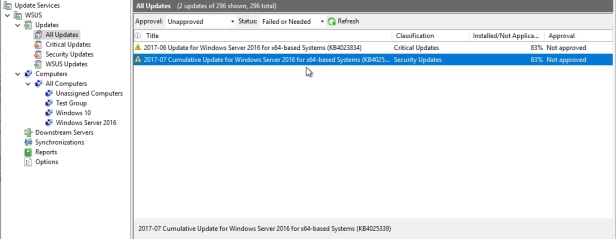
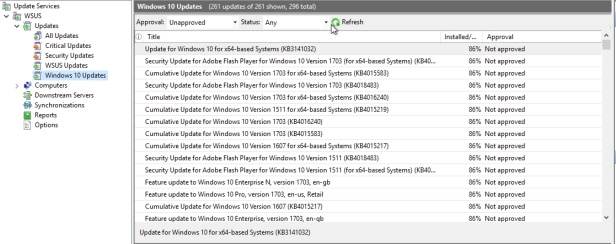
 Under the updates node is where I can take a look at all of the updates that we’ve now downloaded that correspond with Windows Server 2016, as well as Windows 10. One of the hardest parts about WSUS is just kinda figuring out some of its quirkiness at the very beginning, before you begin to tailor it for your use. You’ll notice here that, well there’s not much to look at in our list of all updates and that’s in part because the initial filter that WSUS puts on those updates is to give you only those that are unapproved, where the status is failed or needed.
Obviously you’ve not approved any updates, so you should be seeing a long list of them. But because we don’t have any clients that are currently talking to the server, none of the unapproved updates are actually classified as those that are needed by any of the clients. No clients means no need.
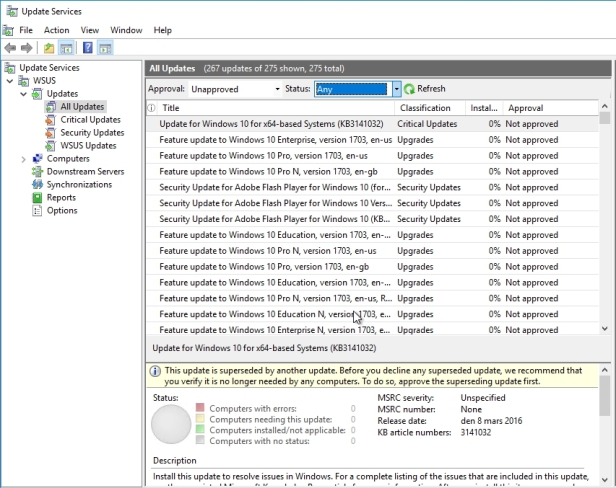
So the way in which we can see them all is to actually change the status from failed or needed to any. To give us a look at the entire, in this case 275 available updates that exist.
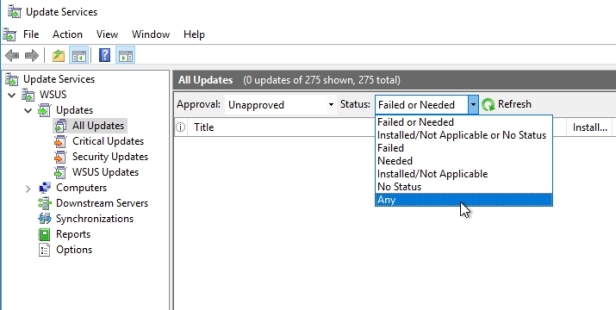
Hit Refresh and you will be able to see all updates.
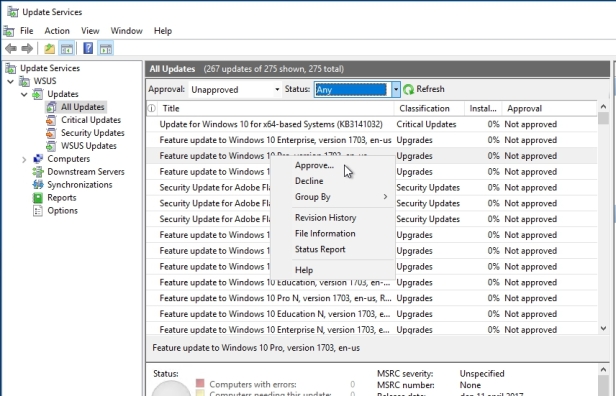
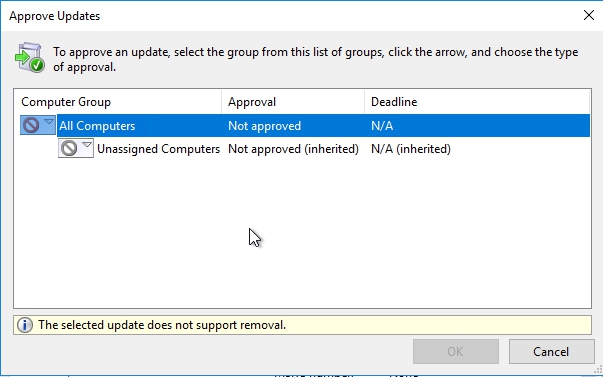
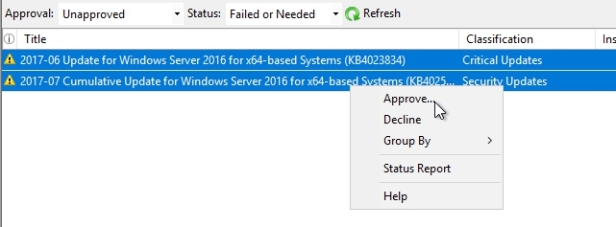
Now, one of the other kind of quirky ways that WSUS behaves that takes a little getting used to, is that WSUS is not really intended as a solution to have you direct updates to install at a specific time on specific machines. Here in this list of updates there’s no way for me to kinda click on an update and say, deploy right now to machines, that’s not how WSUS works. Rather, when you have a list of possible updates, what you need to do is approve the update by right clicking the update and choosing approve.
When you approve that update, you’re gonna approve it for one or more different computer groups. You can see here out of the box we have the all computers, and the unassigned computers groups here and then once those computers, at the client side, once they reach the next interval for checking in with WSUS, downloading and installing any updates, it’s then and only then that they’ll actually complete this process and get the updates downloaded and installed.
Most of us are used to sort of pointing at a server and saying “You update yourself now”. That’s not exactly how this works here with WSUS. Let’s talk about one more thing before we get our clients installed and that has to do with column here called installed as opposed to not applicable.
Now another of the ways that WSUS works, is that clients will, of their own accord, go through scanning themselves, using the metadata here from this WSUS server, to try to figure out whether or not an update is actually applicable to that client or not. If the update is not applicable, as you can imagine, you kinda wanna ignore that update and as we start attaching clients here into our WSUS interface, you’ll see this list of installed or not applicable increased from 0% for various patches, to some other number. The idea here is that the filtering gives you the abilities to identify very easily those updates that, for example, you have not specifically approved, against those updates that are either failed on a client, or are needed by a client.
WSUS GROUPS
Now the first point to make about WSUS groups is that they are separate and distinct from Windows security groups and from Windows distribution groups. WSUS groups are only for use within WSUS. They can be populated using 2 methods by administrators using the WSUS console, which is called server-side targeting, or automatically by preconfigured Group Policy objects, which is called client-side targeting. It’s okay to put one WSUS group inside of another, so nesting is allowed. If you do, settings inheritance is active so that updates deployed to a parent group automatically also deploy to a child group. You can have computers belonging to multiple groups simultaneously, and the group names must be unique. Now by the way, don’t worry about updates getting installed over and over. If a computer belongs to multiple WSUS groups that are approved for the same update, the update only gets installed one time.
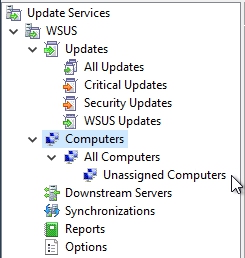
By default there are 2 WSUS groups out-of -the box.
- All Computers –> this group records computer accounts when they contact the WSUS server and this group you should not populate manually
- Unassigned computers –> computers in this group are not assigned to other groups by the WSUS administrator.
The best practice usually is to try to create as few groups as possible. Most often what you find are a couple of computers that are in a test group, perhaps even one or two different test groups, one for the initial release of the update, a slightly larger group to test out possible conflicts with different applications you may have, and then usually just the rest of the computers that make up your organization. If you have fewer groups, then that just creates much less of an administrative overhead when it comes time to approve the different updates for assignment to those groups.
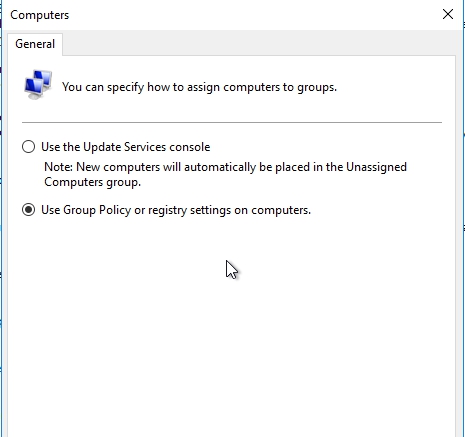
As I said before there are 2 different ways in which machines can get assigned into the groups that you create. To choose which one we want to use we need to click on the options and then click on Computers

It is here where we determine which of those two options we’re gonna choose.
In the first option, we have a server-oriented approach, or essentially, you just clicking on that computer name and plugging it into the group that you want. When you choose to use the update services console, every new computer that arrives as a new client, will have to be manually dragged into the appropriate location in the group structure that you create. For a very small environment, this makes things really easy, ’cause there’s no extra work that’s involved. But in larger environments, you may actually wanna go through using group policy. The one thing about using group policy as the tool for putting computers into groups is that those machines will have to follow whatever structure you have in place for applying that group policy. Most often group policy is assigned by organizational unit, so what generally happens is that your organizational unit structure ends up determining what your group structure will be here within WSUS. In most environments, the use of group policy is kind of the best practice, so I’ll choose this second setting Use Group Policy or registry settings on computers.
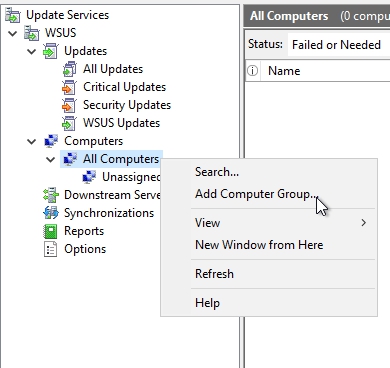
Now I will create 3 new groups. To create a new group you will need to right-click on All Computers and select Add Computer Group
I will call them Windows 10, Windows Server 2016 and Test Group. You can type in whatever name you like, example Production Computers


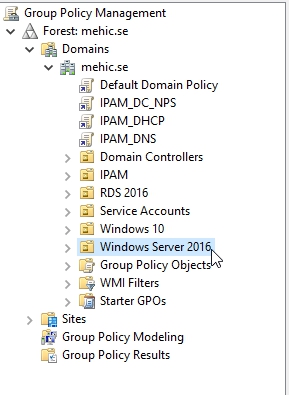
This gives me now the abilities to use group policy to assign the correct machines into either of these two groups. I will open gpo management console on my domain controller and take a look at the different OU’s. I moved few servers to Windows Server 2016 OU and I have one client machine with windows 10 in Windows 10 OU.
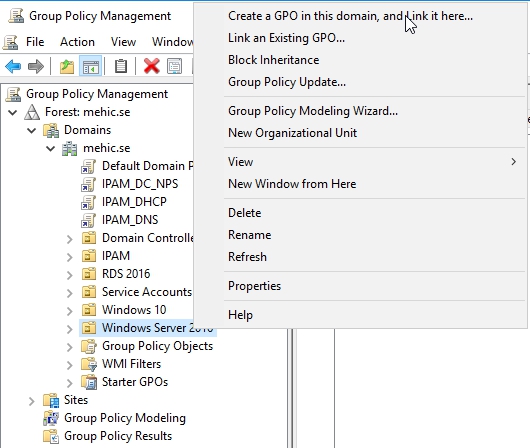
Next step is to create a new GPO and I will link it to Windows Server 2016 OU.
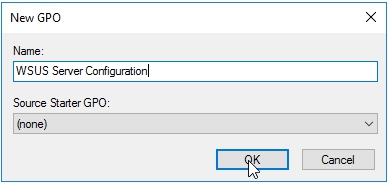
And here for this GPO, once it’s configured and attached, let’s go ahead and edit the GPO so we can look at, first the specific group policy setting that we’ll go about configuring the client-side targeting here for WSUS.
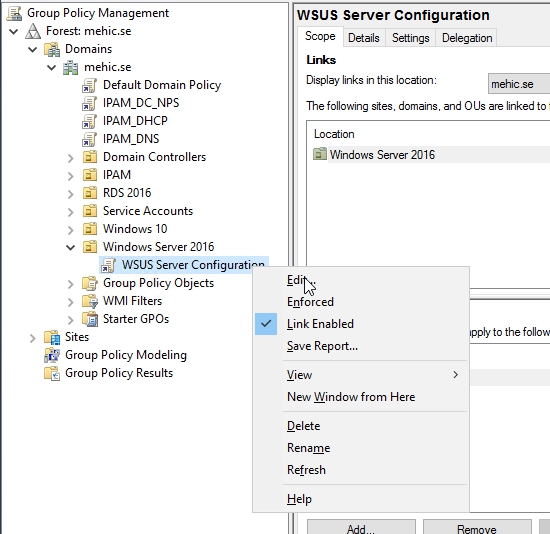
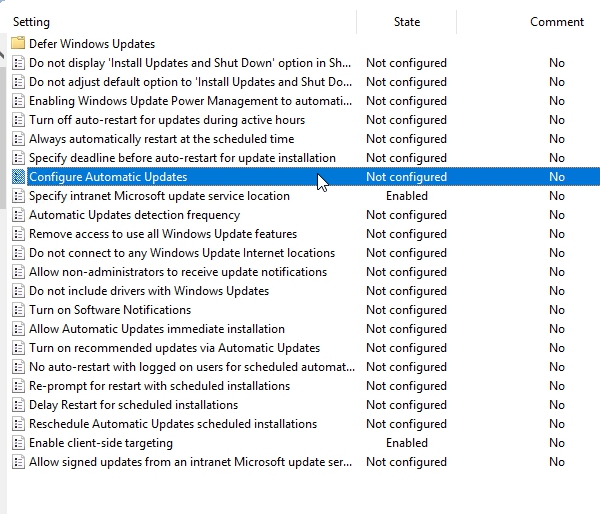
Computer Config\Polices\Administrative Templates\Windows Components\Windows Update
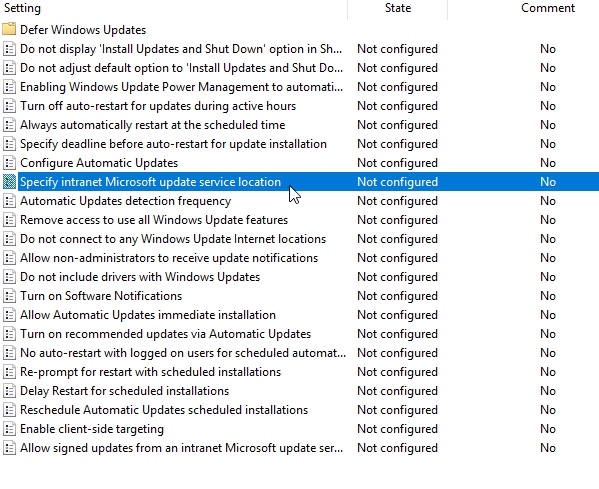
You can see here a very long list of group policy settings that are available for tailoring what is in most cases just the user experience of dealing with WSUS and update deployment.
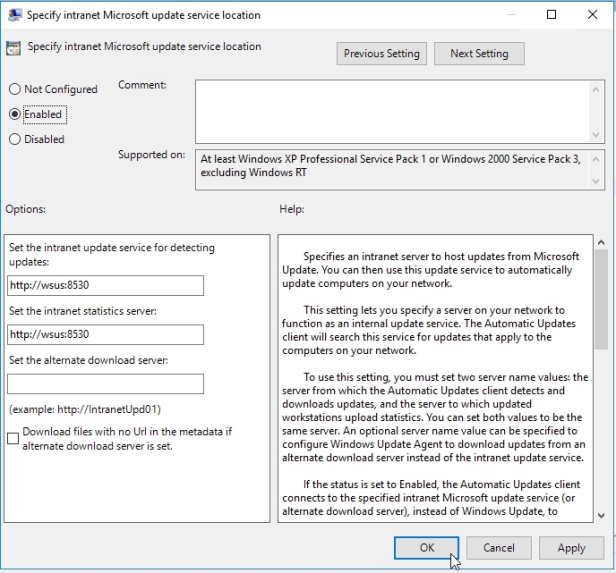
The first thing is to tell clients where WSUS lives, we need to point them into the correct location and we can do that by enabling Specify intranet Microsoft update service location policy.
We will type in WSUS server name and the port number that is used for the clients to attach.
Next policy we need to enable and edit is the Enable client-side targeting
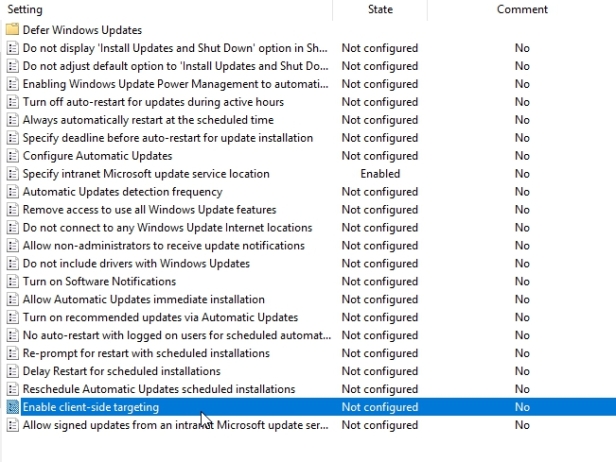
When you enable this setting, the one thing you have to do here is provide a target group name for this computer. That will be the group that we created in WSUS. This now will say any computer that receives this group policy object will have its WSUS configured in such a way that the account will end up in that correct group over in the WSUS console.

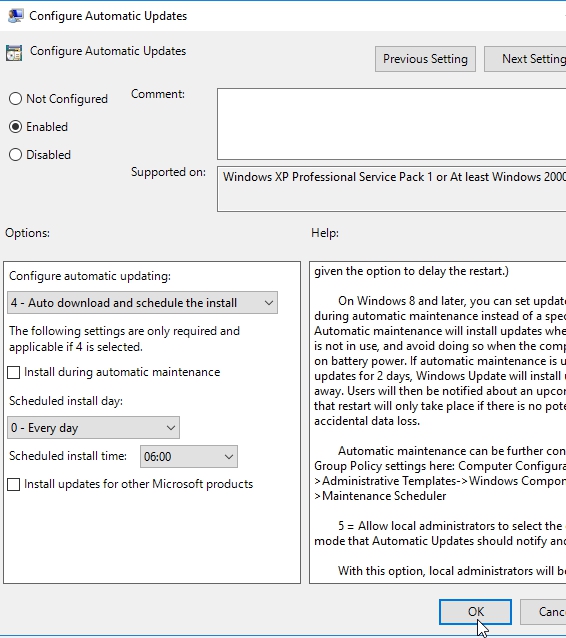
Now we can edit Configure Automatic Updates policy.
Different organizations will choose different ones of these because they want to provide more or less control to the users in participating in the update deployment process. Most often, IT just simply wants to control that process in whole, so you’ll see this number four here as being the setting that’s configured here using group policy. I will choose nr. 4 as well.
Under configue auto updates option we have another check box that allows, in addition to the scheduled install day, which can be either, really any day of the week or every day, and then also the time, whether or not you want those clients to also install during automatic maintenance. Now automatic maintenance is defined as any time that the computer is operating, but the computer recognizes that it’s not really performing any activities. If you take a look under help it says automatic maintenance will install updates when the computer is not in use, and avoid doing so when the computer is running on battery power. So the idea here is that this gives you the abilities to get those updates installed a little more quickly when that machine may not be in use.
Now there is one thing you have to be really careful with when you’re configuring this setting, if you remember we configured the synchronization of the server itself to occur at 04.00 in the morning. Well we wanna make sure that the clients then synchronize with that server at some period after 04.00 in the morning. That is something to keep in mind when configuring this.
Now we need to do the same for windows 10 computers.
Now the final step in this process is for the clients to receive that group policy, process it, and then go through all the machinations that are necessary to grab that update metadata, recognize that they’re attached to a WSUS server, inventory themselves, and report back on what they find. This can take a really long period of time so I will run these 3 commands on client machines to speed up the process
gpupdate /force
wuauclt /resetauthorization /detectnow
wuauclt /reportnow
Now if I go back to WSUS console and hit refresh I should be able to see machines attached to my WSUS server.
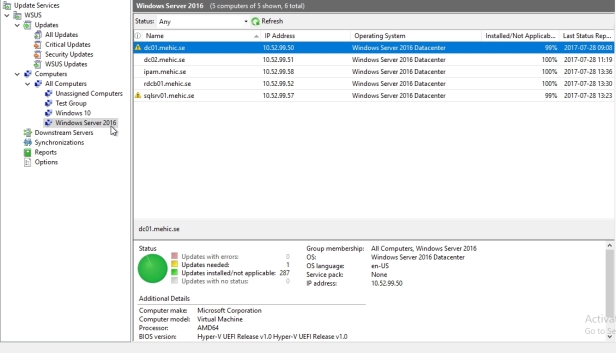
Windows Server 2016 Group
Windows 10
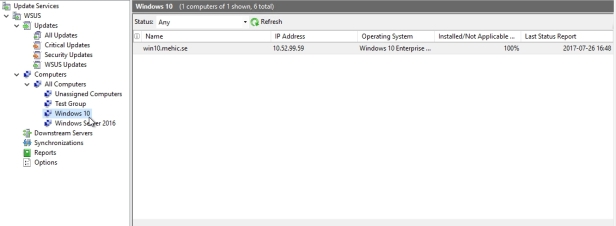
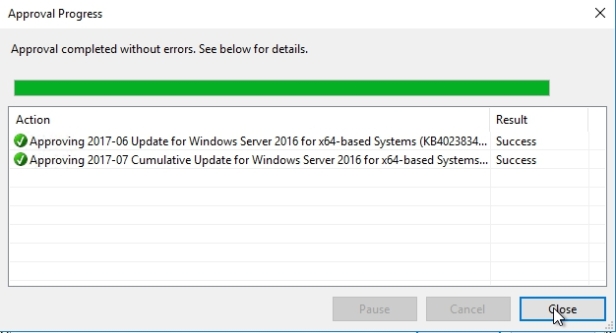
It looks like I have 5 computers in Windows Server 2016 group and one in Windows 10 and if I take a look I’m at almost 100% for all the different updates that should be installed on these machines. DC01 has one update that’s needed. SQLSRV01 has one update that isneeded as well. The easiest way of approving the updates that need to be deployed to these machines starts by coming back to the all updates node, and making sure that I’m looking at the unapproved filter, with the status set to failed or needed.
This will give me the list of which updates are being requested by those computers that have attached to this WSUS infrastructure. And in fact, this makes things really easy for approving these updates, because all I really have to do is to right-click on the update and choose to approve the update for whichever of the groups makes sense for the deployment of that update.
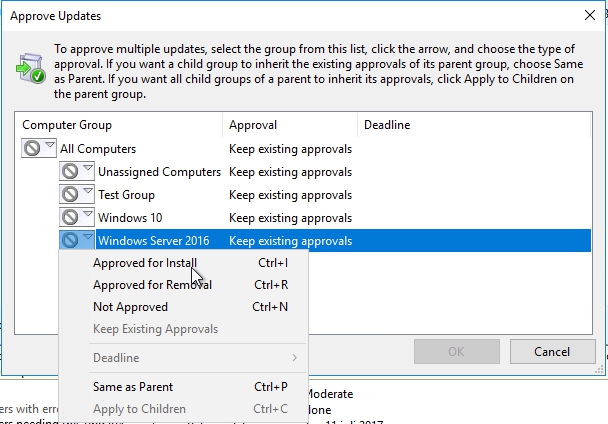
A lot of environments will have one or perhaps two different test groups, where updates are deployed first. Well as you can see this gives you the abilities to first deploy this update to the test computers group, and then only after you have a good comfort level that this update’s not gonna screw anything up, you then go about applying it to the other computers group. I will deploy these 2 to my Win Server 2016 group.
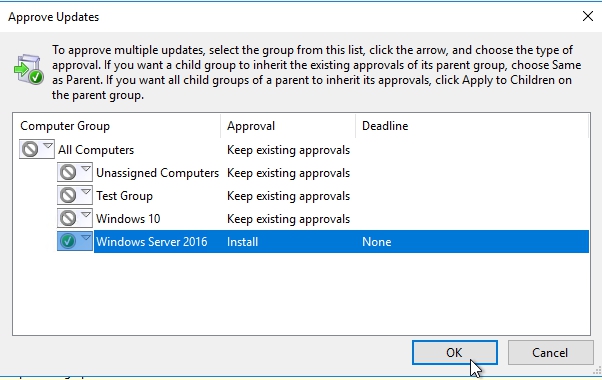
Once you click okay, these updates will now be made available, and then next time that client hits that maintenance interval we’ve configured in group policy, it’ll go about downloading, installing, and perhaps rebooting the computer in order to support the installation of this update.
WSUS Custom View, Reporting and Troubleshooting
Create Custom view
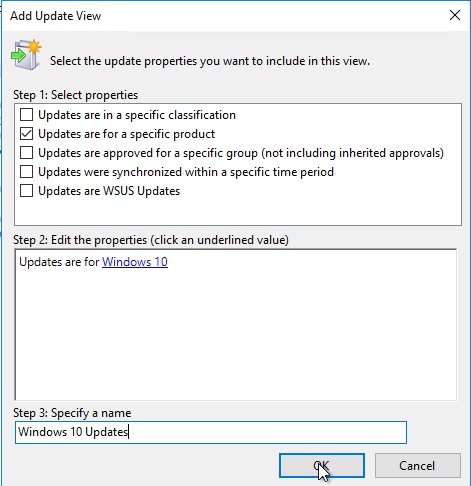
You can create custom views based on classification, product, WSUS group, and even synchronization time period. That’s helpful if you’re looking at a large number of updates. You can also perform searches for updates using substrings in the title or the description
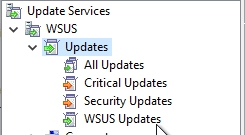
Out of the box we have 4 update views. Those views cannot be deleted or modified.
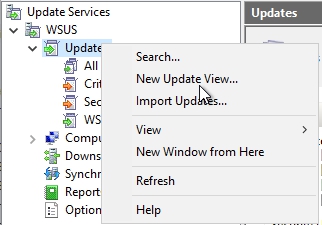
To create a new update view you can right-click on any of those 4 nodes or on updates and select New Update View
Add Update View will pop-up. Here we can choose what we want to include in the view. I will select Updates for a specific product.

In the step 2 we can click on any product link and select which product we want to include. I will choose Windows 10.

In the last step we need to give a name to our view. I will choose Windows 10 Updates just to make it easy. Once done hit OK
Our new view will be available in the list under Updates. If I click on it and if I change the status to any I will be able to see only updates for Windows 10.
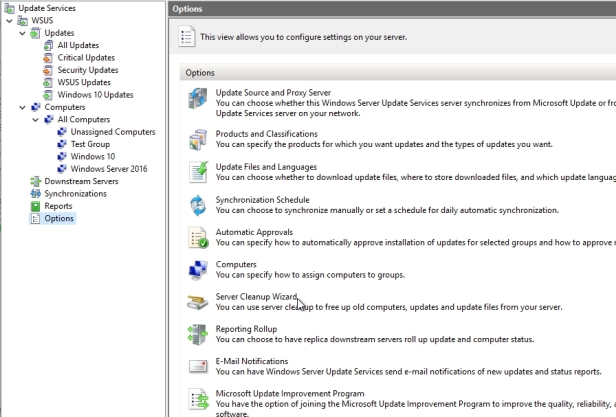
Server Cleanup Wizard
There is also a server cleanup wizard available to you that will delete unneeded files, delete clients that haven’t checked in with WSUS in 30 days, decline updates that have expired, and also decline selected updates that have been superseded or made obsolete by other updates, and, finally, remove declined updates from the database. So most WSUS administrators will run this wizard periodically to keep the databases lean and mean.
To run it you will need to click on Options and Server Cleanup Wizard
Here we can select or choose what to remove. I will choose everything
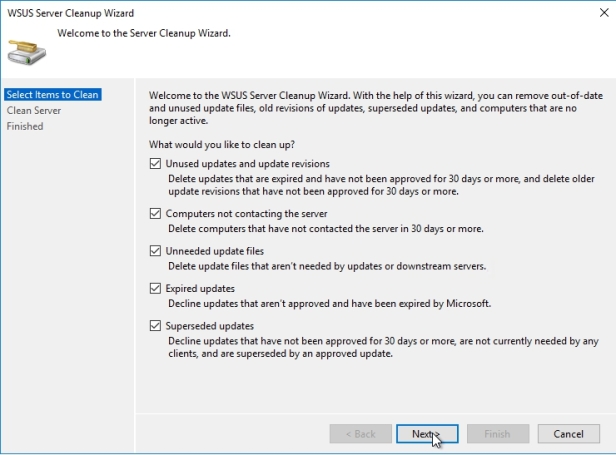
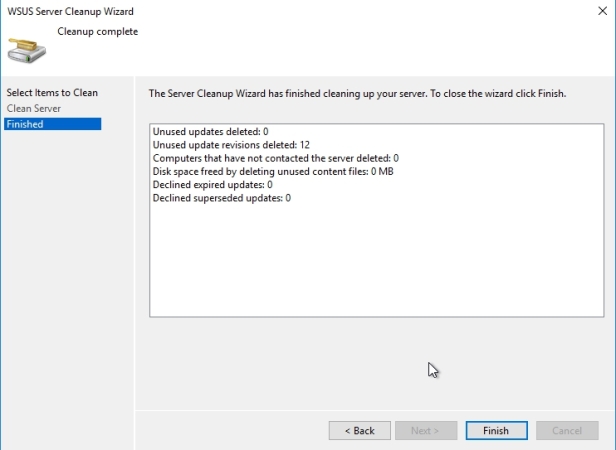
When you click next it will begin with the process. Once done, click finish.

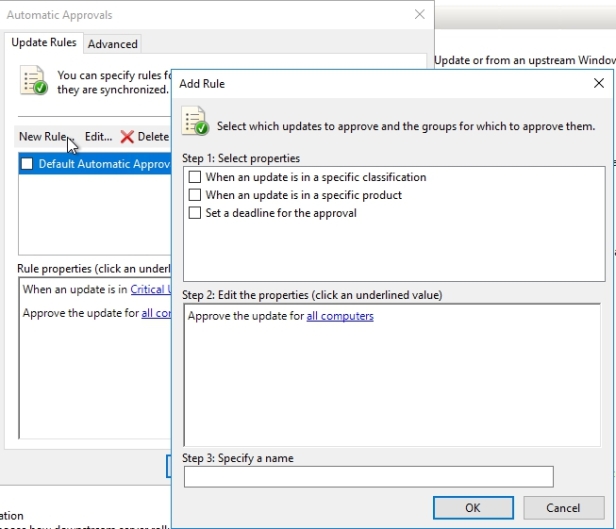
AUTOMATIC APPROVALS
If you don’t want to manually approve every update, WSUS allows you to automatically approve updates according to a simple set of rules. To configure auto approvals click on Options and then Automatic Approvals
When you click on it you will notice a default rule which is not enabled by default. If you enable it you will see that default rule is when the update is either critical or security go ahead and approve it for all computers.

If you don’t like it you can create your own rule based upon when an update is in a specific classification (like critical or security) or product (example Windows 10) or even set a deadline fot the approval and apply that to a specific group or all computers.
Now you want to be careful of this, of course, because sometimes updates can break your servers. So it’s very common for people to test the updates in a development environment first to make sure that it’s not going to break their applications and once they confirm that then they roll those updates out into a production environment. So keep that in mind as you’re working with your WSUS implementations.
WSUS REPORTING
You can pull reports from any kind of WSUS server, root, autonomous, and replica. Requirements are Microsoft Report Viewer 2012 Runtime, and to be able to install that you will need to download a component from the SQL Server 2012 feature pack which is called Microsoft® System CLR Types for Microsoft® SQL Server® 2012

When you install those files it may be necessary to reboot the WSUS server to be able to view update reports.
There are 9 reports available in 3 categories:
- Update Reports
- Computer Reports
- Synchronization Report
There are different versions for summary versus detailed, as well as tabular format, and you can filter the output by classification, product, WSUS group, and/or status. You can also save the output to Excel, PDF, or Word formats.
Now let’s jump back to our WSUS server and check those reports.
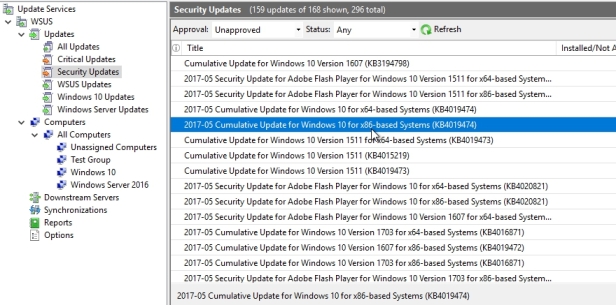
Click for example on Updates Node and click on Security Updates
If you double click on one update it will generate an ad hoc report. Notice at the top I can click the blue links to change the WSUS groups that are included in the report. I can change the status as well. I can specify if I have multiple WSUS servers, do I want to see information from replica downstream servers and so forth. I can see a description of the update, the approval summary, the status summary.

If I go to the next page of the report, I can see a list of computers and the approval designation, as well as the status.
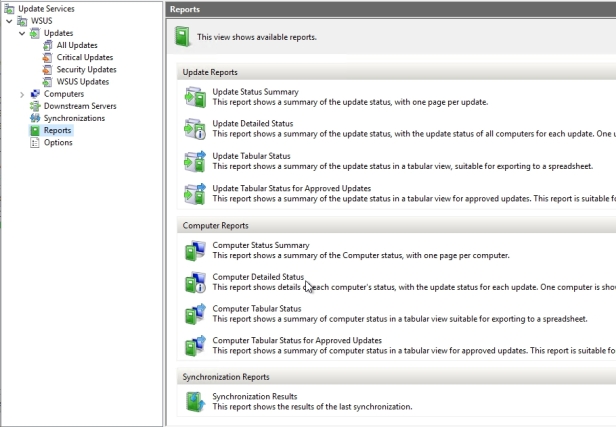
REPORTS NODE
If we click on Reports node we can see the two main types of reports Update Reports and Computer Reports, and then down at the bottom Synchronization Reports as well. The update reports will provide either summary or detailed information on a per update basis and the computer reports will provide summary or detailed information on a per computer basis and there are also tabular reports that are suitable for exporting data.
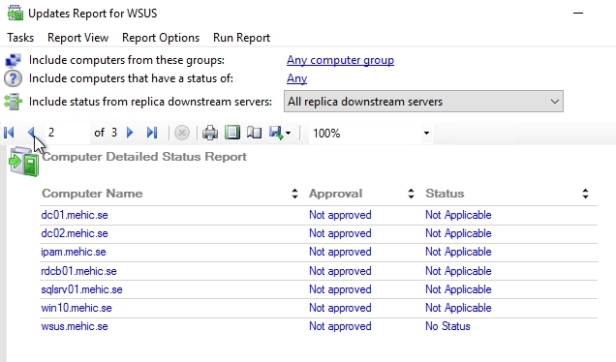
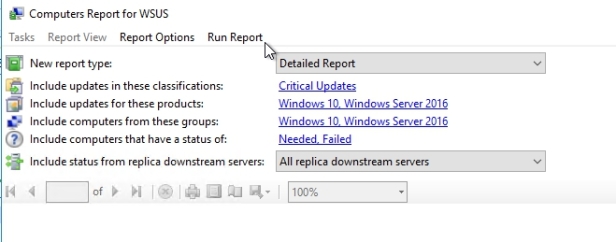
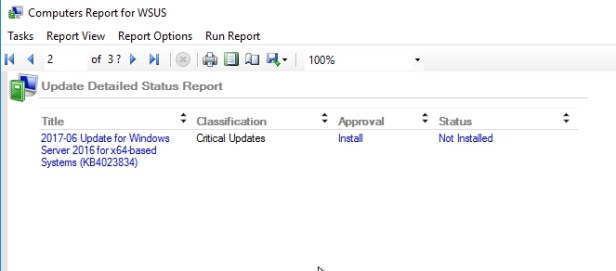
Let’s click for example on Computer Detailed Status
We can tailor the report by clicking the blue links at the top. Once done Run the Report
The first page shows me the computer, and then the second page will show me the updates for that computer.

Superseded Updates
The “Best Practice” in dealing with this situation is Approve the newer update, next we need to verify that all systems have installed the newer update, verify that all systems report the superseded update as Not Applicable and THEN it is safe to decline the superseded update.
To SEARCH for superseded updates, you need only enable the Superseded flag column in the All Updates view, and sort on that column.
In WSUS Console set the display to show the Approval status of ‘Any except Declined’ with a Status of ‘Any’, then Click Refresh
Right click in the title bar and Enable the ‘Supersedence’ column to make it visible.
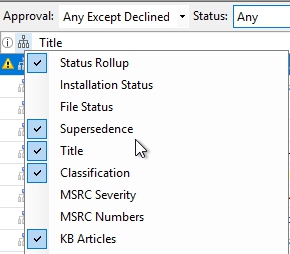
When you do that there will be 4 groups
No Icon: Updates which have never been superseded (You don’t want to decline these)
![]()
Icon with blue square at top: Updates which have superseded another update (You don’t want to decline these)

Icon with blue square at bottom: Updates which have been superseded, but have never superseded another update
![]()
Icon with blue square in middle: Updates which have been superseded and have superseded another update
Once done, run server cleanup wizard and be sure that you have all options selected in the wizard and let it run. It will delete the files from the declined updates.
That’s it. I hope you enjoyed
Thanks for reading!
Cheers,
Nedim

Very Informative article having all wsus basic covered….Keep Up the Good Work Nedim!!
LikeLiked by 1 person
Thanks Gaurav 🙂
LikeLike
Hey Nedim.
How is there in Sweden?
If you remember, economic school in sisak..you’ll see in my email adress name/surname. ☺️
LikeLike
Hej Matija,
Sjecam se skole ali se nesjecam tko si, sorry davno je to bilo ili sam ja ostario prebrzo hehe
LikeLike
Ah ah, u be razred sam isao, sa jozicem. Joze se sjecas valjda? 😀 Crni, nizi, znali smo s njim na bilijar u vrebac, a nas troje smo zajedno bauljali po sljemenu. Isli smo na izlet tam sa skolom, mi se odvojili od grupe, izgubili u sumi, ali i dosli do vrha medju prvima. 😀
LikeLike
Another great post about WSUS. You rock man
LikeLike
AAAAA cekaj sad znam ko je, kako nebi znao, bilo mi je malo u magli ali cim si spomenuo peru i koji razred odma sam skuzio. Kako je stari sta ima? Bas mi je drago da si se javio
LikeLike
A eto vidis. Pa onako, nema nis posebno..ozenio se, dobili kcerku prije dva mjeseca i tako.. Jes ti dugo dole u svedskoj? Zena, djeca i to? Vidim pravi programer, microsoft, nema sta pohvale..
LikeLike
Mocno, cestitam. Ja sam vec 12 i pol godina ovdje i hvala Bogu sve je super. Dobio sam cerku prije 3 i pol mjeseca tako da znas kako je hehe. Sta ces nema od ekonomije nista tako da sam se presaltao u IT i ide mi odlicno bolje nego ekonomija. Sta ti radis, cim se bavis, jesi u HR?
LikeLike
Many thanks Nedim for another excellent guide, keep up
LikeLike
Does WSUS on WS2016 supports more recent version of Report Viewer Runtime ?
Link to MS Report Viewer Runtime version:
https://www.microsoft.com/en-us/download/details.aspx?id=35747 (2012)
https://www.microsoft.com/en-us/download/details.aspx?id=45496 (2015)
https://www.microsoft.com/en-us/download/details.aspx?id=52676 (2016) (Feature pack that includes the Report Viewer Runtime 2016)
LikeLike
2012 is the only explicitely-mentioned version supported on the current latest WS2016 build.. as seen here: https://www.rootusers.com/wp-content/uploads/2017/01/wsus-report-viewer-redistributable-error.png (image taken from user trying to run “Reports” on an WS2016’s WSUS server
LikeLike
Hi,
To be honest I didn’t try with newer version of report viewer.
LikeLike
You are awesome man, many thanks
LikeLike
Thank you for clean and easy to follow guide. You are the one of the best writers on the net I have seen. Keep up with good work.
LikeLike
Dodaj me na fb da nepisemo ovdje previse ako nije problem.
LikeLike
E pa da, to ti ja odma napiso da mi na mail pises ak hoces. Nemam facebook vec par godina, al ak oces evo mail matijagrbus@yahoo.com, il ak imas whatsupp +385981952206. Ak si na viberu mogu ga instalirat.
LikeLike
Ok, thanks..
Might worth looking. I wonder if the new report viewer version provide/detect additional useful available meta data to report from..
LikeLike
Great post Nedim, 5 stars for your effort
LikeLike
Thank you Nedim, great article about WSUS
LikeLike
Thank you Nedim very much. Your site is a gold mine for people like me. Thank you for explaining how things work without just showing how to install something, Great work
LikeLike
Another excellent post Nedim, keep up with the good work. I would like to see troubleshooting as well 🙂
LikeLike
You are king man, great work
LikeLike
Your site is great, excellent work so far. Keep it that way.
LikeLike
Great stuff you have on the site Nedim, I like it very much. TY 🙂
LikeLike
Thank you for sharing the knowledge, great site.
LikeLike
Thanks Nedim for showing wsus 2016. Great article
LikeLike
Good read so far. A part3 would be much appreciated…
how to make a Windows Core 2016 use SSL both for the console management and for the clients updates. Cheers and keep up the good work!
LikeLike
Thank you Nedim for taking your valuable in sharing this article. This article is in-depth article I have seen so far. In fact, even the MS training material does not explain these details. Glad I came across your blog site.
LikeLiked by 1 person
Good Job Nadim, great article.
LikeLiked by 1 person
Thanks for sharing the knowledge, best wsus article on the internet
LikeLiked by 1 person