
Why do we need to talk about anti-phishing policies when we have SPF,DKIM and DMARC?
The answer is that they do different things. The goal of SPF, DKIM, and DMARC is to prevent direct domain spoofing and impersonation, in other words, prevent criminal’s from pretending to be your organization by forging the sender addresses on emails. SPF, DKIM, and DMARC are implemented by created specially-formatted DNS records. If you missed my post about DKIM and DMARC implementation you can check it here DKIM / DMARC CONFIGURATION. For SPF, DKIM, and DMARC, there is no cost to use them, aside from your time to plan and implement the DNS records, there’s no other costs involved, they’re just DNS records.
Anti-phishing policies have a different goal, they are aimed to detect the use of lookalike domains and email addresses in phishing and other attacks. Anti-phishing policies are implemented as policies within Advanced Threat Protection, along with Safe Links and Safe Attachments. Anti-phishing policies are an ATP feature, that means they’re only available to you if you are paying for ATP licenses in your Office 365 tenant, whether that’s paying for them as standalone add-on licenses or as part of one of the license bundles, that includes ATP.
So what is a lookalike domain?
It’s a domain that looks like another one. Just like these two, legitimate mehic.se is first, and then a lookalike domain mehiç.se using this ç character to substitute for letter c is second. To the casual observer or to the busy end user, the difference is quite subtle and can easily go unnoticed.
The two key elements of an anti-phishing policy in ATP are:
Lookalike detection –> spotting domains or email addresses that closely match your own organization’s protected addresses and domains
Mailbox intelligence –> which uses what Office 365 knows about your sending and receiving patterns to flag when a suspicious email has come from an address that you previously have not communicated with.
Let’s start with a simple phishing email. We can see here that this administrator@nmehic.onmicroşoft.com email requesting Office 365 creds for configuring MFA for that user but the e-mail is actually coming from a lookalike domain. So there’s every chance that this email will make it through SPF and DKIM checks. If the users are not paying attention on this, they could easily be tricked into replying and providing their creds to that attacker. Just to point that I didin’t configure custom domain in my test tenant and the domain I am using is @nmehic.onmicrosoft.com

We want to prevent that by configuring anti-phishing policies, which can be found in the Security and Compliance Center.

Before we go and create new Anti-phishing policie, I would like to point that we have a default one. We cannot delete this policy but we can edit it and the custom policies you create take precedence over the default policy.

When you click on it, you will have the option to edit it.

Let’s create a new anti-phishing policy.

Give it a name and click on Next

Now we need to choose the recipients that we’re applying this to, and much the same as all the other ATP policies I’ve been configuring, I am going to apply this to all users.

Click on Choose

Click on + ADD

And select the domain, once done click ADD and click on Done

Click Next and Create this Policy

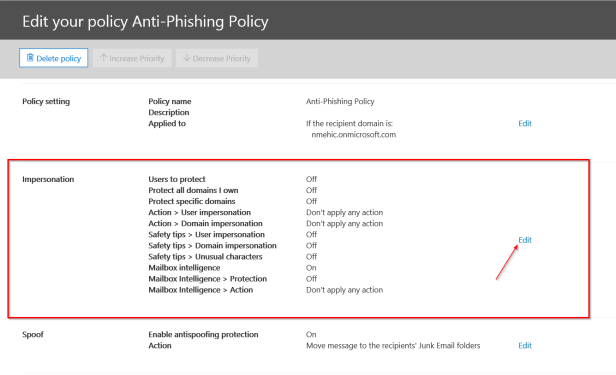
Once done, new window will pop-up and we will be able to configure additional settings.
First Section is Impersonation. Click on EDIT
First we need to enable this setting and add users to protect.
ADD USERS TO PROTECT
Now these are not the recipients of phishing emails, these are users that we want to protect from being impersonated. So this would be a case of adding perhaps your CEO’s address, or your payroll addresses, those sort of things.

I have 2 users so I will add them here.

ADD DOMAINS TO PROTECT
Next, we can include domains to protect. Again, these are not domains of recipients that we’re protecting from receiving phishing emails, these are domains that we want to protect from being impersonated by attackers. Now the easiest way to include all of the domains or the custom domains within your tenant is to simply turn this option here to on to automatically include the domains I own. This also means if you add a custom domain to your tenant at a later date, it will automatically become protected by this policy. If there’s any other domains you want to protect, perhaps partner domains or banking domains, you can also add them in manually.

ACTIONS
Next we need to choose the actions that will be taken on any emails that are deemed to be impersonating senders or impersonating domains and the actions include redirecting, moving to the junk mail box, quarantining, adding someone to the BCC line or deleting the message. Quarantining these messages is probably highly recommended but for this demonstation I will select Junk folder for both.

Once you choose the Actions, click on the Turn on impersonaton safety tips link and enable all 3 options.


MAILBOX INTELLIGENCE
The next option is to decide if we want to use mailbox intelligence. This is where Office 365 uses what it knows about your sending and receiving patterns to work out whether a suspicious email is coming from someone you don’t normally communicate with. By default, mailbox intelligence is selected when you create a new anti-phishing policy. Leave this setting On and activate the second one as well, Enable mailbox intelligence based impersonation protection with Quarantine option.

ADD TRUSTED SENDERS AND DOMAINS
If we had a partner company or a subsidiary that used a very similar email domain to the parent company, that similarity might be enough to trigger the anti-phishing policy, it might seem to be a lookalike domain, so we could add it as a trusted domain here, that it won’t be called up as a false positive.

Last page is all about reviewing our settings and once done click on SAVE.

SPOOF SECTION
Click on your policy again so that we can check other options. Next one is enabled by default. It is called Spoof. Office 365 includes default anti-spoofing protection that’s always running. This default protection is not visible in the Security & Compliance Center or retrievable through Windows PowerShell cmdlets. You can’t modify the default anti-spoofing protection. Instead, you can configure how strictly Office 365 enforces the anti-spoofing protection in each anti-phishing policy that you create. Even though the anti-spoofing policy appears under the anti-phishing policy, it does not inherit its default behavior from the existing phishing setting under the Anti-spam configuration.

In the Actions pane, we can choose what will happen with the messages sent from someone who’s not allowed to spoof us

ADVANCED SETTINGS

Defines the level of settings for how phishing messages are handled. I will leave this as is.

Okay, let’s take a look and see if that anti-phishing policy is actually effective. I will send a new email from a lookalike domain. I have received phishing email that I’ve generated, and this time we can see that it has been junked, and it’s also had a safety tip warning the user that the sender might be impersonating a domain that’s associated with our organization. So that safety tip has been inserted by the anti-phishing policy to draw the user’s attention to that lookalike domain.

In the case of the message that was a phishing message that originally made it through to the inbox, the user also has the option to report it as a phishing email, and that will report will go to Microsoft, and it will help them to tune their anti-phishing algorithms.
That’s it.
I hope this has been informative for you.
Stay Tuned!
Cheers,
Nedim

What a great explanation and walkthrough. 5 stars for the site and many thanks for office 365
LikeLiked by 1 person