In this part we will move forward and continue with RD Web Access page customization.
This time we will customize the page that’s shown after a user logs on.
This is how our login page looks like after branding Part 2

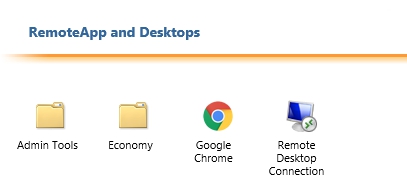
When we login, the main page is actually made up of two pages. The first page is the page that shows you the published Desktops and RemoteApp programs.
I published several RemoteApps and arranged them into a folder structure.
Admin Tools: Disk CleanUp, Resources Monitor, Server Manager Snipping Tools
Economy: Calculator, Paint, WordPad

Second Page is shown when you click the “Connect to a remote PC” tab.

- First we will focus on this part of the page (Web Access Navigation Bar).

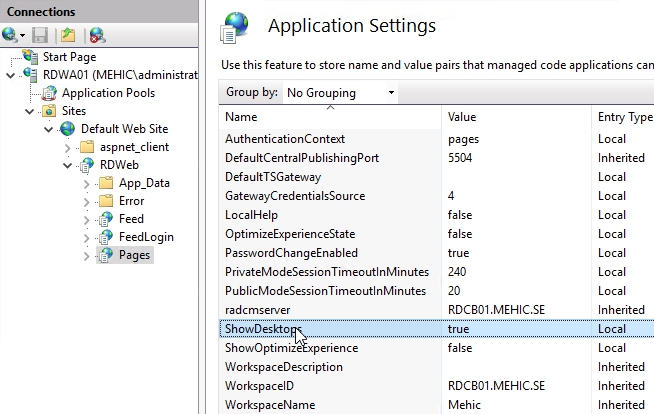
If you want to give access only to RemoteApps and remove second page completely, you will have to open IIS and expand the tree on the left and click Pages, then double-click Application Settings

Select ShowDesktops. Notice its value is TRUE by default and click Edit to change it to FALSE. This change is immediate, without the need to restart IIS.

- Next thing what we can change is the HELP LINK.

OBS!!! The login page has a Help link as well which means that you could specify different Help content for the login page and the main page if you wish. Users usually never click on Help link and because of that I will change it to the MAIL, so that users can access webmail from the Main Page.
I will first remove/hide Help Link from the Main Page. We will need to edit %windir%\web\rdweb\pages\site.xsl file. (I will use Notepad++ which can be downloaded from https://notepad-plus-plus.org/download/v7.3.2.html )
Line 316 and change <td> to <!–<td>
Line 320 should look like this </td>–>
Line 322 should look like this <!–<td width=”15″> </td>
Line 324 should look like this <td width=”15″> </td>–>
This is the result from line 316 to 325

Reload the RDWA page and the Help Link is gone.

- Now let’s add Hotmail link to navigation bar (Like this you can add whatever you want)
<td>
<a href=”https://outlook.com” target=”_new”>
Hotmail
</a>
</td>
<td width=”15″> </td>
<td class=”dividerInNavigationBar”>|</td>
<td width=”15″> </td>
You will need to paste this code before Line 316, I mean click on line 315 and press enter to move to line 316 and paste this code. It should look like this

Reload the RDWA page and there’s our new link!

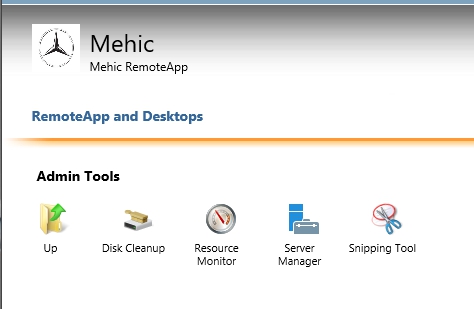
- Next thing we can do is to remove Current folder test

If you click on Admin Tools it will look like this

I think it should be better to have only Admin Tools. Like that our Main Page will look cleaner. Let’s remove that. Browse to the windir%\web\rdweb\pages\site.xsl.
If you edited this file along in this post, you’ll need to go to line 542

Change this code to be like
<div class="tswa_CurrentFolderLabel"><span><xsl:attribute name='id'><xsl:value-of select="$feedidprefix"/>CurrentFolderPath</xsl:attribute><xsl:value-of select="substring-after(appfeed:Publisher[1]/@DisplayFolder, '/')"/> </span></div>

Save the file and reload the RDWA page. Current Folder will disappear. This time when we click on admin tools it will show us only the folder name.
That’s it.
Cheers,
Nedim


Leave a comment