Microsoft announced the next version of Windows Server 2 days ago which is available through Microsoft’s Insider Program. If you are interested and would like to get Windows Server 2019 as an ISO file or a VHDX please sign in for the Insider Program and you will be able to download it. You will have access to Full version (LTSC) or core. When you install core you can use powershell or Project Honolulu to administer it. Windows Server 2019 will make it easier to connect on-premises software with Microsoft cloud services like Azure Backup, Azure File Sync, and disaster recovery and Microsoft plans to significantly improve compute, storage, and networking of clusters running on top of that software.
Some of the new features in Windows Server 2019:
- Microsoft plan to reduce size on the Server core image to 5 GB so it will be faster to download and deploy it in containers.
- Linux security updates
- Windows Defender Advanced Threat Protection
- Extended Clusters with Cluster Sets
- Windows Defender ATP Exploit Guard
- Shielded virtual machines: Offline mode, Alternate HGS, VMConnect and Shielded Linux support
- Performance history for Storage Spaces Direct
When you register you will be able to download ISO or VHDX and Project Honolulu Preview.

WINDOWS SERVER VNext LTSC Preview –> Is the full version of the server 2019. I will download it and make an upgrade from server 2016 to 2019 in the next post.
I downloaded ISO file. We will first install it and then we will add it to Project Honolulu. You will notice that the process is the same. On the first window we need to choose the Language, Keyboard and Time zone. Now on the second screen we have only 2 options and both are the core versions because I downloaded Sem-Annual.

and here it is….

Now, download and install project honolulu from the same page. Once done click on the installation file

On the Licensing Page, Select I accept the terms in the License Agreement and then click Next.

Select Allow Project “Honolulu” to modify this machines’s trusted hosts settings and Create a desktop shortcut to launch Project “Honolulu” then click Next.

On the Configure Gateway Endpoint page, type port number you want to use and then click Install and Finish

Once done, click on the Project Honolulu Desktop Icon and enter the user name and password.

You will see the our gateway server is added automatically.

Click +ADD from web management Interface to add new connection.

Select Add Server Connection on Add Connection page.
Type in the name of your server 2019 or any other server that you want to add and click on SUBMIT. Now if you want you can bulk import many server on Import Servers Tab.
If you get prompted for credentials specify it and then click on SUBMIT.

and your server /servers will appear in the list. Click on server name which you would like to manage and you will see the detail monitor items and management tools that you can use to change the settings for the server. I will click on server 2019


On the Overview page we have option to see CPU/RAM/NETWORK usage and basic stuff like shutdown/restart server.
EDIT COMPUTER ID –> Here we can rename the computer or change domain/workgroup settings
SETTINGS –>Here we have option to enable for example Remote Desktop Connection


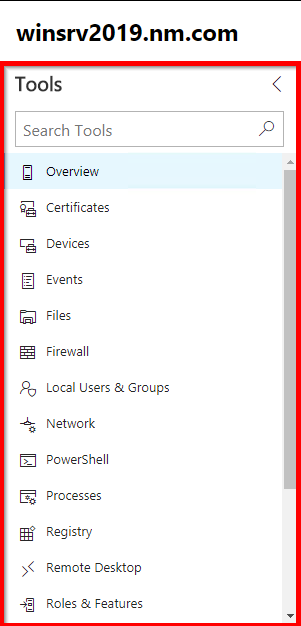
You will notice that you can manage a lot of things from a single pane of glass. Example:
Displaying resources and resource utilization
Certificate Management
Event Viewer
File Explorer
Firewall Management
Configuring Local Users and Groups
Network Settings, Powershell direct to the machine etc.

FILES -> Fast access to File Explorer

NETWORK –> It makes it easier to access network settings


Let’s install AD Domain services and let’s promote this server into a domain controller. You will notice that is really easy to install new roles or to manage servers from Project Honolulu
Click on Roles & Features, select the role you would like to install (ADDS in my case) and click on the Install

Now click on the Powershell node and let’s promote this guy to a domain controller.
Install-ADDSDomainController -Credential (Get-Credential) `
-NoGlobalCatalog:$false `
-CreateDnsDelegation:$false `
-CriticalReplicationOnly:$false `
-DatabasePath "C:\Windows\NTDS" `
-DomainName 'nm.com' `
-InstallDns:$true `
-LogPath "C:\Windows\NTDS" `
-NoRebootOnCompletion:$false `
-SiteName "Default-First-Site-Name" `
-SysvolPath "C:\Windows\SYSVOL" `
-Force:$true


Now if I switch to my DC01 we will able to see our server 2019 as a new DC in a domain.


You will notice that is really easy to manage servers with Project Honolulu. I hope you enjoyed and stay tuned for more action with Server 2019.
Cheers,
Nedim

Hi Nedim,
Thank you so much for sharing your knowledge. Your site have better material then Microsoft. Keep up with good work.
Best Regards,
Marco
LikeLike
Ty Marco
LikeLike
Many thanks nedim for this one
LikeLike
thanks mate for this one. Keep up
LikeLike
Greetings from Germany,
Great introduction to server 2019. I would like to see more of this stuff.
Best regards
Hans
LikeLike
Thanks for the review Nedim. I heard that we will not be able to use remote desktop session host role in 2019? is that true?
LikeLike
Thank you for this one…
LikeLike
Svaka cast
LikeLiked by 1 person
Awesome. Been looking for this sine. Great work Nedim.
LikeLiked by 1 person