By default every licensed user in the tenant can create office 365 group. That can sound great but think if you have 1000 users and allowing users to create the groups they think they need can result in a chaos. Creating groups often leads to groups used for a period and then left to decay. Although the idea of giving users the power to decide what groups they need to collaborate with their colleagues is great, it is better when administrators put some thought and planning into the process of group creation and maintenance. This is especially important in enterprise environments.
Things to keep in mind!
- If you want to use policy to block group creation you will need to have Azure AD P1 license. So the admin who configures these group creation settings and the members of the security group who are allowed to create groups need azure AD license P1 license
- When you use this approach to restrict group creation, the decision applies to all applications that use Office 365 Groups for membership services. You cannot choose for example to block group creation in teams but permit in sharepoint.
- You will need AzureADPreview powershell module to configure this
- If you are member of any of these roles the policy won’t prevent you from creating groups:
Company Administrator (global administrators)
Team Service Administrator
User Account Administrator
Mailbox Administrator
Partner Tier1 Support
Partner Tier2 Support
Directory Writers
OBS!!! Keep in mind. Microsoft is saying that we can create new Office 365 Groups even if restriction is in place. That is true if you are creating new groups from for ex Admin center but when you enable restriction, even if you are global admin you will not be able to create new Teams from Microsoft Teams. You will need to add your account into group that is allowed to create new groups. If you are using admin center then there are no issues. More info later in this post.
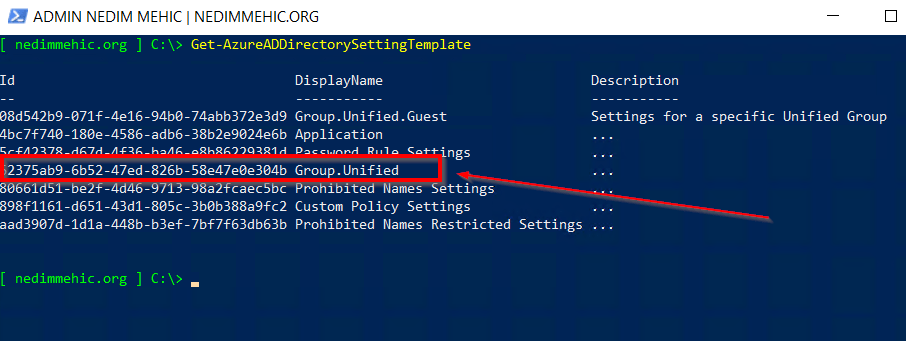
By default tenant does not have a policy and all applications are using default settings. If we want to change some of those default settings we will have to create a new directory settings to hold the policy settings from the correct template. To see all the templates that we can use, we need to run Get-AzureADDirectorySettingTemplate
The template that allows creation of new groups is the one with the name Group.Unified.

CREATE NEW DIRECTORY SETTINGS OBJECT

To view Directory Settings we need to run Get-AzureADDirectorySetting and expand Values property

That what we need to do now is to change EnableGroupCreation from True to False.
OBS!!! When you want to update individual settings in the Groups policy, keep in mind that the names of policy settings are case-sensitive. You have to type exactly EnableGroupCreation and not for example enablegroupcreation.
First step is to get directory settings.
$directorysettings = Get-AzureADDirectorySetting | ? displayName -like “Group.Unified”
Next, we need to change EnableGroupCreation from true to false
$directorysettings[“EnableGroupCreation”] = “False”
Last step is to update the directory settings
Set-AzureADDirectorySetting -Id $directorysettings.Id -DirectorySetting $directorysettings

We can verify it by running Get-AzureADDirectorySetting | select -ExpandProperty values

Now, only users that are members of these roles (Company Administrator, Team Service Administrator, User Account Administrator, Mailbox Administrator, Partner Tier1 Support, Partner Tier2 Support, Directory Writers) will be able to create new groups.
What if we have users that are not members of these roles but need to create new groups?
To accomplish this we need to create a new group (security group is the best option) and add users to it. Then we need to populate GroupCreationAllowedGroupId setting with the ID of the security group.

First step is to create a group. I will use this one.

We need to take ObjectId and populate GroupCreationAllowedGroupId setting.

OBS! It may take up to an hour before users in the security group can create new groups.
Group Expiration Policy
This policy is used to automatically remove obsolete groups. Policy control how long groups can exist within a tenant before a group owner must renew the group. As groups expire, Office 365 can automatically remove them from the tenant. The expiration policy applies to all Office 365 Groups, no matter how they are used.
Things to keep in mind:
- Owners of the group are notified to renew the group as the expiration nears
- Any group that is not renewed is deleted
- Any Office 365 group that is deleted can be restored within 30 days by the group owners or the administrator
- When you first set up expiration, any groups that are older than the expiration interval are set to 30 days until expiration. The first renewal notification email is sent out within a day.
- Admins will need to have Azure Active Directory Premium P1 license
- Configuring and using the expiration policy for Office 365 groups requires you to possess Azure AD Premium licenses for the members of all groups to which the expiration policy is applied.
To configure Expiration policy browse to portal.azure.com and click on Azure Active Directory –> Groups –> Expiration

- Group Lifetime –> Default value is 365.
- Email contact for groups with no owner –> If the group has no owner you need to notify someone that the group is about to expire. You can create unique address just for this or you can add the address of a distribution group or Office 365 group, or the SMTP addresses for multiple recipients (separated by semi-colons).
- Enable expiration for these Office 365 Groups –> We have 3 options here
NONE — means that the policy is disabled
SELECTED –> Policy will apply only to selected office 365 groups
ALL –> All Office 365 groups

If you select ALL and later change to SELECTED, policy will only apply to the groups under scope Selected.
Owners will receive three warning notifications before Office 365 removes a group: 30 days before the group expires, 15 days before the group expires and one day before the group expires. If there are groups without owner notifications will go to the recipient nominated in the policy.
You may notice that after enabling group expiration, it is possible that some groups will expire immediately because their creation date is older than permitted by the expiry period. If that is the case the Office 365 will send second expiry notification which means that owner needs to renew the group within 15 days. All groups that expire are soft-deleted groups and owners can restore them within 30 days.
Limiting Office 365 Group Creation is a great way to have control over your tenant. If you decide that only admins are able to create new groups then you can create directory setting and leave it as is. After creation you can use admin center to create new groups and on this way avoid license cost.
That’s it. I hope you enjoyed and learned something new.
Stay Tuned!
Cheers,
Nedim


Leave a comment