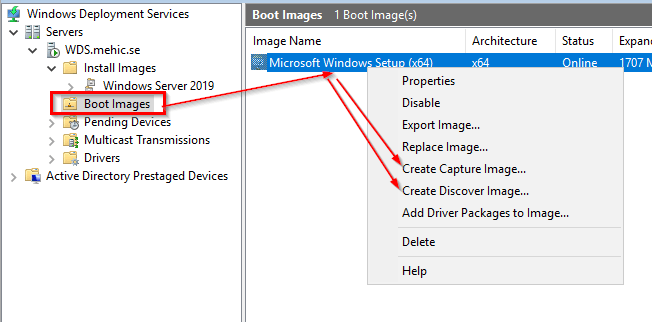
Before we deploy images to our machines, let’s talk about images and the difference between them. If you click on Boot Images and if you right-click on your boot image you will see Capture Image and Discover Image options.

We will start with Discover Image
DISCOVER IMAGE
In certain circumstances, I may have a situation where I may have some clients that are unable to communicate over PXE, maybe client does not support PXE or you are sending those images over a very slow link or where you’ve got a high security environment. It can happen when your network team doesn’t like that traffic passing over the network. When that’s the case, you can actually burn a copy of this boot image to a DVD or burn it to a USB stick by creating what is called a Discover Image. This Discover Image, the whole job of this is just simply to get that bootstrapping information, that WinPE content, onto that machine so that it can boot up and then use your usual Windows protocols to communicate back to our WDS server and download the install image to be deployed.
To create a Discover Image click on Boot Images –> Right-click on your boot image and select Create Descover Image

Give it a name and description, then specify the location where you want to save it to. If needed you can specify the WDS server. Click Next


The last step is to save this to example USB drive and boot the computer to the media.
CAPTURE IMAGE
In other circumstances, you may not necessarily be interested in the actual install image right off the USB. You may want to configure a custom image that includes applications, different configurations that are specific to the needs of that user or group. Well, in that case, you can actually go about creating that machine as a golden image or a reference image, and then capture the contents of that image through what is called a Capture Image. Before creating capture image make sure that you have OS deployed with all apps and customizations you need. Then run sysprep on the machine you would like to use for golden image with OOBE, Generalize and Shutdown options. I imported Windows 10 boot image this time. To create a Capture Image, click on Boot Images –> Right-click on your boot image and select Create Capture Image

Give it a name, description and the location where you want to save it. Click Next

After a few minutes we will be able to see it under the Boot Images. Click the Add image to the WDS now

Follow the steps and here it is

Now change the boot order to boot from the network and start the sysprepped VM. Select the Capture Image we created.

On the WDS Image Capture Wizard click next. On the Directory to capture select the volume and give your image a name and the description

New Image Location –> Enter the name and location, check Upload image to a WDS server and connect to your WDS. (Just to point that I went to WDS server and created Windows 10 Image Group)

After the completion of capturing install image click on Finish to close the wizard.

Once done, go back to your WDS and refresh the View.

Now if we boot client again we will have option to use the new golden image. Select the first option

Choose the local and keyboard input and specify the domain credentials

Select the image and follow the wizard and that’s it.


PENDING DEVICES
Before we proceed I would like to point that I created new Hyper-V Gen2 VM that I will use from now on. Make sure that you change boot option to boot from network.
INFO: To be able to boot gen2 VM from network you will need to configure these 2 options on your DHCP server.
66 –> wds.domain.com
67 –> Boot\x64\wdsmgfw.efi

Let’s power it on so that we can take a look at the steps we’re going to go through in order to connect up to WDS. When you boot your machine you will notice like WDS is saying: All right, well, here is your connection. You are now waiting approval from the administrator. If you remember from the first post, I checked the box that said we need to approve any unknown computers before we deploy an operating system to them.

Go back to your WDS server and click on Pending Devices

If you right-click on it you will have options: Approve, Name and Approve and Reject. If you remember from the first post, we were talking about how WDS kind of wants to give this machine a randomized name (AD DS Tab on server properties), which, for a lot of environments, this isn’t going to fly because we want to give those machines a specific name. Well, it’s this name and approve right here where I can define more information about the machine, specifically the name that I want to give it as I go through deploying this operating system. Click on Name and Approve

Approve Pending Device Wizard pops up, Give your device a name and specify where you will store the machine, in which OU. Click Next

I can identify what the referral server would be, or essentially where it should get its boot. wim file, also which boot program and which boot image it should download as well. These can all be left blank if you just want to choose the defaults. Click Next

Here I can identify what the unattend file should be for getting that machine bootstrapped. I don’t have any file so I will skip this step. We will discuss more about Automation and WDS in the third post. Click Next

Choosing Next again allows me to identify what the user settings and device settings should be. Once done, click finish

This will now complete the name and approve process, and if I flip back over to my VM machine, we should see that WDS has given the instruction here to this machine to begin deploying the boot. wim file and bootstrapping itself into Windows PE. Notice here that we’re now booting into Windows PE. This is, as I said, the boot. wim right here that we’re downloading from our Windows Deployment Server.

Now, just follow the wizard, choose the desired image to install and next, next finish.

REMOVE PENDING, REJECTED AND APPROVED DEVICES
Once device is approved it will stay under the pending devices. We can remove those entries from the list by starting powershell and typing
Approved Devices
wdsutil /delete-autoadddevices /devicetype:approveddevices
Rejected Devices
wdsutil /delete-autoadddevices /devicetype:rejecteddevices
Pending Devices
wdsutil /delete-autoadddevices /devicetype:pendingdevices
MULTICAST TRANSMISSION
Multicast transmission is used when you need to deploy image to a large number of clients without overloading your network. Let’s say that we need to deploy windows 10 image to 50 clients. With multicast you will send this image only once and not 50 times. You can accomplish this only if you are using scheduled cast. If you do an automatic cast the number would be greater as each new machine that boots up after the first would have missed parts of the stream and the WDS server would have to re-stream the parts that were missed. Let’s see how we can configure this.
In your WDS console, Right-click on multicast transmissions and then click create multicast transmission.

Enter the name and click next

Choose the Image group and the image and click next

Here you have the choice to choose between Auto-Cast and the Scheduled cast. I will select Scheduled-cast and I will mark the first box. It will allow me to provide a threshold which means, wait until 5 clients request the image. Once done, start the transmission. Second box will give us option to schedule and start the cast at the specific time. Click next and finish


If we right-click on the transmission we will have the option to view the properties, to force the start if needed and to deactivate/delete the transmission.

ACTIVE DIRECTORY PRESTAGED DEVICES
Everything that we’re doing so far has to do with WDS working hand-in-hand with active directory to get these machines built and also to get them inserted into our active directory domain. But in certain circumstances, we may not necessarily, based off of the configuration that you’ve set, have that ability natively built into WDS. For that reason, we have this ability here, with our active directory prestaged devices, to identify devices that we want to automatically add in once those devices boot up. When those devices boot up, if we have some unique identifier for that device, like the MAC address or like that GUID, we can use either of those unique identifiers as a way of mapping that machine to an active directory account. These clients are also called known clients.

Here I need to identify a name and a device ID for a specific machine. This device ID can be one of a couple of different items like MAC address or GUID. If I click Next, this will tell me again the same things like I saw before: Who is my referral server? What’s my policy for when that machine attempts to boot etc so I will not go through the wizard again.

That’s it. I hope you enjoyed. I am planing to create a third post and it that one we will go through zero-touch installation. If there is interest I will make a third one with automation.
Stay Tuned!
Cheers,
Nedim


Leave a comment